Inspections
Give inspection findings the context they need.
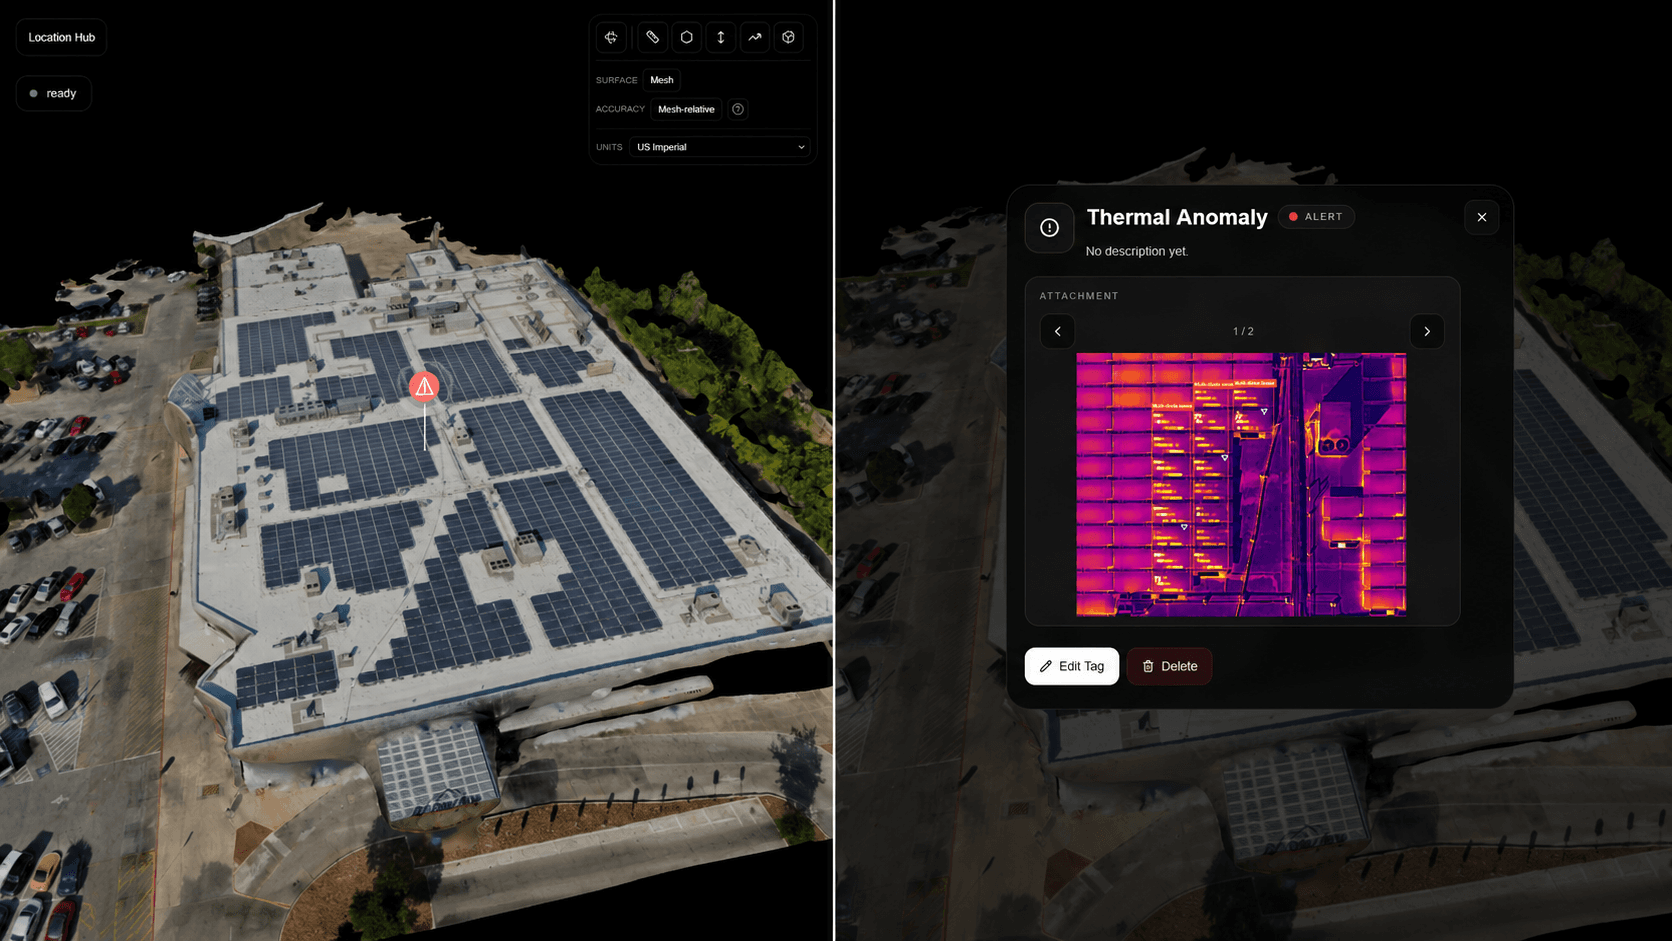
Clients do not only need a PDF. They need to see the roof, façade, array, or site the findings came from. SpearAtlas keeps imagery, spatial outputs, notes, and reports together so the inspection package is reviewable in one place.
No credit card required · Free plan includes 5 GB
The delivery problem
Findings lose force when they leave the visuals.
Roof, building, solar, and infrastructure inspections often produce a dense still set, an optional ortho or mesh, a written report, and a handful of notes that lived in the pilot’s head. Those pieces scatter: photos in a gallery link, the report in email, the map in another tool.
The client then cannot tell which photo belongs to which elevation, or how a callout relates to the rest of the structure. You end up narrating the job again on a call.
SpearAtlas does not detect defects, score thermal anomalies, or issue engineering conclusions. It holds the imagery, maps, models, annotations, measurements, and PDFs you already produced so the findings keep their spatial context during review.
- Photo dumps without structure or site context
- Reports detached from the imagery they cite
- Notes lost in email instead of on the deliverable
- Clients unable to see where a finding sits on the asset
How SpearAtlas fits
The inspection package, still attached to the site
Upload the stills, any ortho or mesh, the PDF, and supporting sheets into one project. Add annotations on supported map and image surfaces, and measurements where the deliverable supports them.
Share a read-only project so the property owner, contractor, or facility manager can move from the overview map to the close-up stills to the report without reconstructing your folder logic.
Capture / process
Your drone, scanner, photogrammetry, or reconstruction software produces the files. SpearAtlas is not in this step.
Step 1 of 4Organize in SpearAtlas
Upload the outputs into Mission Hub rooms so maps, models, media, and documents sit on the same project.
Step 2 of 4Deliver
Preview the client experience, then share one project link instead of a chain of folders.
Step 3 of 4Client views
Recipients review supported files in the browser, with the project context still attached.
Step 4 of 4
Relevant deliverables
Formats this workflow typically brings in
Inspection jobs vary. Use the rooms that match what you captured—SpearAtlas does not invent analysis on top of these files.
- JPEG / PNG / WebPInspection photos, progress stills, and supporting imagery.
- GeoTIFF / TIFFOrthomosaic map rooms for hosted GeoTIFF review.
- OBJPhotogrammetry meshes in the 3D Space room.
- GLB / GLTFTextured 3D models for site and structure review.
- LAS / LAZOptional aligned point-cloud layers in Space.
- MP4Hosted project and progress video in a dedicated room.
- PDFReports and plan PDFs delivered with the same project.
- CSVTables and field notes kept with supporting files.
- DOC / DOCXWritten reports and scope notes in supporting files.
- XLS / XLSXSpreadsheets attached to the same mission workspace.
In the workspace
Capabilities that apply here
Inspection imagery in one room
Keep façade, roof, and detail stills with the job so reviewers are not paging through a disconnected album.
Inspection imagery in one room in SpearAtlas →Notes on the work itself
Place callouts on supported maps and imagery so comments stay on the visual, not in a side email.
Notes on the work itself in SpearAtlas →Measurements on supported deliverables
Distance and area on georeferenced orthos, plus 3D distance, area, height, slope, and volume in Space when a mesh is present. SpearAtlas reports what you measure; it does not certify the inspection.
Measurements on supported deliverables in SpearAtlas →Site or roof context maps
When the inspection includes an ortho, host it so close-up stills have a map to sit against.
Site or roof context maps in SpearAtlas →The written report beside the visuals
Deliver the PDF in the same project as the photos and maps the report refers to.
The written report beside the visuals in SpearAtlas →Clear client handoff
One project link for the owner or contractor. Read-only review, not a dump of raw files.
Clear client handoff in SpearAtlas →
A typical project
A typical inspection delivery
A commercial roof inspection: drone stills of every elevation, a small ortho of the roof plane, annotated leak locations, a few length checks, and a PDF narrative for the property manager.
Capture and write the report
Complete the inspection with your usual camera, drone, and reporting process. SpearAtlas does not classify damage or write the findings.
Upload the visual record
Put stills in Images, the roof ortho in Maps if you produced one, and the PDF in reports. Add a mesh to Space only if that was part of the job.
Attach context
Add annotations on the map or imagery for the locations you already identified. Measure on supported surfaces when a dimension helps the client read the finding.
Share for review
Send the project link. The manager can see the photo, the location on the roof, and the written report without asking you to resend folders.
Continue
Related workflows and product pages
- RoofingPresent roof documentation clearly.
- Solar & EnergyKeep site visits and reports together.
- ConstructionKeep site documentation together.
- Annotations on deliverablesSpearAtlas product
- Measurement toolsSpearAtlas product
- Image deliverySpearAtlas product
Back to SpearAtlas homeView pricing
Related guides
- How to Review a Point Cloud Before Delivering It to a ClientA practical workflow for reviewing an exported LAS or LAZ point cloud before client delivery, including orientation, attributes, coordinates, a distance check, and keeping the original file.
- GCPs vs Checkpoints in Drone Mapping: What Is the Difference?Learn the difference between ground control points and checkpoints in drone mapping, including how they affect photogrammetry accuracy, RTK workflows, control distribution, residuals, and independent verification.
- Coordinate Systems in Drone Mapping: CRS, Datums, EPSG Codes, and Elevation ExplainedLearn how coordinate systems work in drone mapping, including CRS, datums, projections, EPSG codes, State Plane, UTM, latitude and longitude, vertical datums, and why mapping files sometimes fail to align.
Get started
Keep the next inspection’s evidence in one project.
Put imagery, maps, notes, and reports together so findings stay attached to the asset you inspected.